How to Build a Simple Todo App with React
Fun side project that you can start building today

If you’re in the middle of trying to learn React, you have probably faced a lot of articles and tutorials telling you to start building your own projects in order to stretch your abilities and expand your knowledge. That’s true, in my opinion, it is also the fastest way.
Figuring out what to build can be so hard and takes a lot of time. Another ‘Hello World!’ like apps won’t really teach you much. On the other hand, facing a huge project that does almost everything is not a great idea either. It’s easy to get overwhelmed and as a result you might give up. You don’t want this to happen!
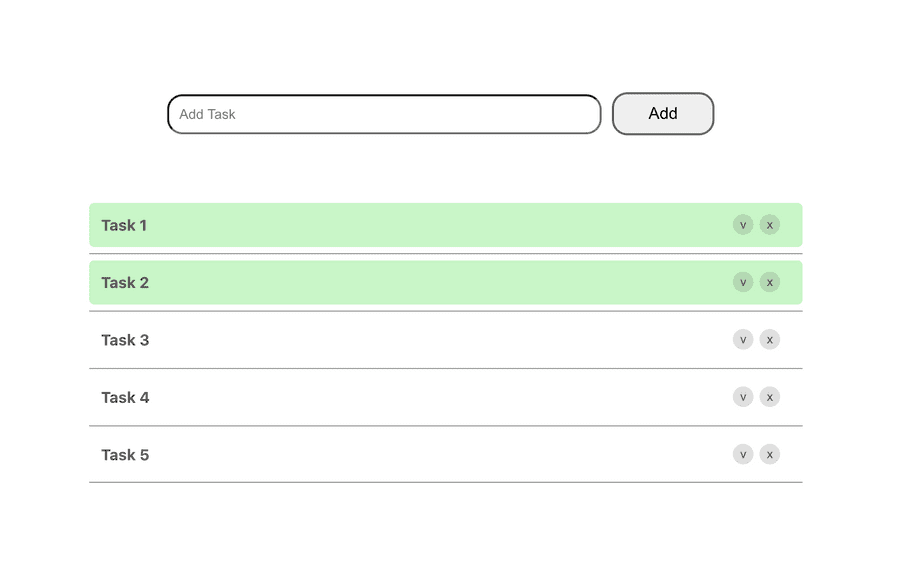
In this tutorial, I will cover all the details to build my own version of the simple Todo App. This is very known project that almost every developer makes in the beginning of the learning process. This small project covers a lot of interesting details in React and can be an excellent practice to take your coding skills to the next level!
This tutorial assumes that you have a basic understanding of JavaScript concepts. Essentially, you need to know what variables, arrays, functions and objects are, but you do not need to have prior experience with building React applications, we will cover all the details together.
Before We Begin
Planning is the key! The planning phase is the most important phase of every software project no matter how big or small it is. Building the perfect app or becoming an amazing programmer is much more than learning the syntax of a specific programming language. If you want to push your skills to the next level, you need to invest more time and effort into planning your projects before you start coding, doing this will surely improve your thinking skills and will lead to better results.
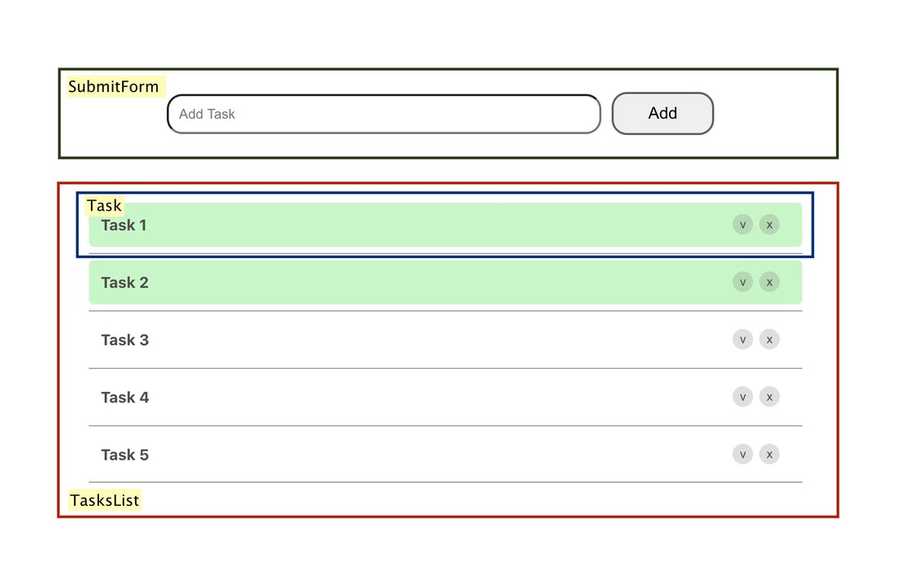
Let’s start with building a simple schema that we will follow while working on our Todo List App, this schema will give us basic understanding of what we are building and will also contain all the components that should be built in order to get the expected results.

In order to draw this schema, you can use any tool you like, starting from hand drawing on a paper to figure out what you really want, or even using more professional tools like draw.io to get much more satisfying drawings. It doesn’t matter which tool you choose to use, the process and the benefits from it are the same.
As described in the schema above, we need to build three react components:
- SubmitForm – This component contains the form that the user needs to fill in order to add one task to the list. It includes an edit box for the input and a submit button.
- TasksList – This is the container for all existing tasks.
- Task – This component is for a single task. it contains the task term and two buttons, one is to mark the task as done, and the other for removing the task from the tasks list.
In addition to these three components, we will also have the ‘App’ component which will be automatically generated when creating the react app and eventually it will contain all the other components to form the final Todo App.
Setup
For implementing this Todo App I will use Visual Studio Code as my text editor. you can consider using any other text editors that you wish like Atom or Sublime Text. You can also use social development environment like CodePen that allows you to build a website, debug it and share it using there presentation mode.
To make things easier, as a beginning, I suggest to start off with Visual Studio Code. Some of its benefits are:
- Free to use
- IDE features
- Open Source
- Supported by large community including Microsoft
You will also need to install Node.js version >= 8.10 on your local development machine. This will insure installing a package managing application called npm which also includes a tool called npx that will run executable packages.
The npx tool enables us to run a remote script that will start with creating a new directory for our new project and will also run ‘npm install’ inside this directory in order to download all the additional dependencies that we will need.
Let's Start!
To install the base project, run the following command:
npx create-react-app todoapp The name of the created react application is ‘todoapp’. You can choose the name you want but make sure its all written with small letters.
Now your project is set up in a new directory called ‘todoapp’. Let’s change into this new directory:
cd todoapp At this point, you’ve created a new project and you exist in the root directory. typing the following command will start the project:
npm start Running this command will automatically open the initial project in your browser window. If that doesn’t happen, you still can do this manually by visiting this address http://localhost:3000/. I suggest you keep the project open in your browser so you can see the site in action and track all the changes you make step by step.
To keep our project organised, I suggest you navigate to the ‘src’ directory, and create there a new folder called ‘components’. Inside this directory, create three directories, one for each component we need in order to create our Todo App: SubmitForm, TasksList and Task.
Now you can open the project in the text editor that you want to work with, and you can start by opening the ‘App.js’ file and removing all the default lines inside the render function. To this function we will add the components that we create to form the Todo App.
Submit Form
Navigate to the ‘SubmitForm’ folder inside the ‘Components’ directory that we have created previously and create the following two files: ‘SubmitForm.js’ and ‘SubmitForm.css’. Here we want to create the SubmitForm component that will be responsible for getting the input from the user and pass it to the other components.
As described in the schema above, we need to create a ‘form’ element, that contains two elements: input and submit button. Let’s do it together!
import React from 'react';
import './SubmitForm.css';a

class SubmitForm extends React.Component{
    render(){
        return (
            <div className='form'>
                <form>
                    <input className='input' placeholder='Add Task' />
                    <button className='add-button' type='submit'>Add</button>
                </form>
            </div>
        );
    }
}

export default SubmitForm;
At the very top of our ‘SubmitForm.js’ file import the ‘react’ library in order to create the component using React. Next, create SubmitForm component by extending ‘React.Component’.
Add a return statement to the render() method with a JSX statement that renders the elements that we want to see. The class names you see above, will be useful when we style these elements with CSS. Let’s take a look at out ‘SubmitForm.css’ file:
.form{
    margin-top: 100px;
    margin-bottom: 50px;
}

.input{
    width: 400px;
    padding: 10px;
    border-radius: 15px;
    outline: none;
}

.add-button{
    width: 100px;
    padding: 10px;
    font-size: 16px;
    margin: 10px;
    border: 2px solid rgb(97, 97, 97);
    border-radius: 15px;
    outline: none;
}

.add-button:hover{
    background-color: #ccc;
    cursor: pointer;
}
This CSS won’t be useful if your ‘SubmitForm’ component cannot access it. At the top of ‘SubmitForm.js’ make sure you import the ‘SubmitForm.css’ file. Remember that it lives in the same parent directory as ‘SubmitForm.js’.
In this ‘SubmitForm.css’ I wanted to have minimal and clear input area for the user to add the tasks. I wanted it to be in the center of the page with white background, gray borders and no outlines. For the ‘Add’ button, I wanted to have darker gray background when hovering over it in order to have more user friendly interface.
For this part, you can be so creative and style your ‘SubmitForm’ the way you like it and make it more personal and unique. This is also a great practice to improve you CSS skills.
Let’s move on to the next part! Now we should handle the case of clicking the ‘Add’ button to add new task to the list. First, we should add the ‘ref’ attribute to the ‘input’ element in order to store a reference to the input that the user wants to add. Let’s call this property ‘_inputElement’. The following line will be the final ‘input’ element:
<input className='input' ref={(a) => this._inputElement = a} placeholder='Add Task' />
Let’s create ‘addItem’ function that will be responsible for handling the new input the user wants to add:
constructor(props){
        super(props);
        this.state = { tasksCount: 0 };

        this.addItem = this.addItem.bind(this);
    }

    addItem(e) {
        if (this._inputElement.value !== "") {
            var newItem = {
              text: this._inputElement.value,
              id: this.state.tasksCount,
              key: Date.now()
            };

            this.props.addTask(newItem);

            this.state.tasksCount++;
            this._inputElement.value = "";
        }

        e.preventDefault();
    }
First, add a constructor to the ‘SubmitForm’ class. Add to the state of the component ‘tasksCount’, we will use this counter to be a unique id for every created task, this will help us when we want to delete a specific task. In addition, make sure to bind the addItem() method.
Next, create ‘addItem’ function that accepts one parameter ‘e’, check if the reference to the input is not empty, which mean there is a new input exist in the edit box, in case this is true, create a new item with the following fields: Text for the term, id for the unique number of this task and a key.
As you can see, we’ve made a call to the addTask() function in the props. This function will be passed to the ‘SubmitForm’ component from it’s parent, which is the ‘App’ component. For now, let’s use it, and pass to it the new created item as an input. We will explain more about it and why we need it when we start building the ‘App’ component.
In order to finish the implementation of the addItem() function, increment the tasks counter and clear the input value to be ready for the next task.
To the form element, we should add ‘onSubmit’ attribute and pass a reference to the addItem() method that will handle this case:
<form onSubmit={this.addItem}>
Task
Navigate to the ‘Task’ folder inside the ‘Components’ directory that we have created previously and create the following two files: ‘Task.js’ and ‘Task.css’.
The ‘Task’ component should contain h2 element for the task term and two button elements. In order to style it beautifully, I will add some div elements as described in the render function below:
import React from 'react';
import './Task.css';

class Task extends React.Component{
    constructor(props){
        super(props);

        this.removeTask = this.removeTask.bind(this);
        this.markDone = this.markDone.bind(this);

        this.state = {
            backgroundColor: ''
        }
    }

    removeTask(){
        this.props.removeTask(this.props.id);
    }

    markDone(){
        if (this.state.backgroundColor === ''){
            this.setState({ backgroundColor: 'rgb(144,238,144, 0.5)' });
        } else {
            this.setState({backgroundColor: ''});
        }
    }

    render(){
        return (
            <div className='task-container'>
                <div className='task-container-background' style={{backgroundColor: this.state.backgroundColor}}>
                    <div className='task-term-container'>
                        <h2 className='task-term'>{this.props.text}</h2>
                    </div>
                    <div className='buttons-container'>
                        <button className='done-button' onClick={this.markDone}>v</button>
                        <button className='delete-button' onClick={this.removeTask}>x</button>
                    </div>
                </div>
            </div>
        );
    }

}

export default Task;
The ‘Task’ class contains two methods that will be used in the render function, so we need to bind them in the constructor. Next, we will add ‘backgroundColor’ to the state, this will store the current background color of the task. If the task is marked as done, we want the background color to be light green, otherwise, we should keep it white. You can take a look at the implementation of the markDone() function.
In the render function above, you can see a div that surrounds the <h2> and the buttons elements with a class name of “task-container-background”. To this <div> element we added a style attribute in order to set the background color according to the state we currently have.
Let’s take a look at removeTask() function, here we simply make a call to removeTask() function that exist in the props, this function should be passed to the ‘Task’ component from it’s parent, which is the ‘App’ component. We will talk about this more in details when we build our ‘App’ component.
Make sure to add ‘onClick’ attribute to each button element and add a reference to the method that should be called when clicking on the button. When clicking on the ‘delete-button’ the method removeTask() should be called. For the ‘done-button’, markDone() function should be called.
Let’s take a look at the ‘Task.css’ file:
.task-container{
    display: flex;
    border-bottom: 1px solid #979797;
    width: 100%;

}

.task-container-background{
    display: flex;
    flex-grow: 1;
    margin-bottom: 6px;
    margin-top: 6px;
    border-radius: 5px;
    padding-left: 2px;
    padding-right: 2px;
    transition: all 0.2s ease-in-out;
}

.task-container-background:hover{
    background-color: #ccc;
}

.task-term-container{
    display: flex;
    width: 90%;
}

.task-term{
    font-size: 15px;
    color: #514c4c;
    padding-right: 10px;
    padding-left: 10px;
}

.buttons-container{
    display: flex;
    align-items: center;
}

.delete-button, .done-button{
    display: flex;
    width: 20px;
    height: 20px;
    background-color: rgb(97, 97, 97, 0.2);
    color: #454E53;
    border: none;
    outline: none;
    border-radius: 50%;
    font-size: 12px;
    margin: 3px;
    justify-content: center;
    align-items: center;
}

.delete-button:hover, .done-button:hover{
    background-color: rgb(97, 97, 97, 0.5);
    cursor: pointer;
}
Tasks List
Let’s move on to build our third component, TasksList!
As we have already did, let’s navigate to the ‘TasksList’ directory and create two files there: ‘TasksList.js’ and ‘TasksList.css’.
The purpose of this component is to be a container to store all the tasks that the user might insert. From this definition, it is obvious that we need to import the ‘Task’ component.
Inside the render() function, create a <div> with class name ‘tasks-list-component’. Inside this container, create one more <div> with a class name ‘tasks-list’. We will use these <div> elements to style the tasks list the way we want it to be.
import React from 'react';
import './TasksList.css'
import Task from '../Task/Task';

class TasksList extends React.Component{

    render(){
        return (
            <div className='tasks-list-container'>
                <div className='tasks-list'>
                    { this.props.tasks.map(task => <Task key={task.key} text={task.text} id={task.id} removeTask={this.props.removeTask}/>) }
                </div>
            </div>
        );
    }
}

export default TasksList;
‘TasksList’ should get an input from its parent that contains all the tasks that we have. Take a look at the most important line in this render function, we take all the tasks from the props, then we map each task to be a <Task /> component.
For each <Task /> component we pass the key, id and the text of the task. You can see that we also pass the removeTask() function that we get from the ‘App’ parent in order to give each task the ability to remove itself when the delete button is clicked.
Here you can see the ‘TasksList.css’ file:
.tasks-list-container{
    display: flex;
    width: 40%;
    margin: auto;
    justify-content: center;
}

.tasks-list{
    width: 100%;
    padding-left: 10px;
    padding-right: 10px;
}
App
The ‘App’ component was automatically generated when we created the React app and it contains some default JSX lines. Remove everything inside the render function and let’s build it together.
Inside the render function add one <div> element with class name ‘App’. Inside this div add the <SubmitForm /> component and then the <TasksList />. Make sure to import these components at the beginning of the ‘App.js’ file.
import React from 'react';
import './App.css';
import SubmitForm from './components/SubmitForm/SubmitForm';
import TasksList from './components/TasksList/TasksList'

class App extends React.Component{
  constructor(props){
    super(props);
    this.state ={tasks: []}

    this.addTask = this.addTask.bind(this);
    this.removeTask = this.removeTask.bind(this);
  }

  addTask(task){
    this.setState((prevState) => {
      return {
        tasks: prevState.tasks.concat(task)
      };
    });
  }

  removeTask(id){
      const tasks = this.state.tasks.filter(element => (element.id !== id));
      this.setState({ tasks: tasks });
  }

  render(){
    return (
      <div className="App">
        <SubmitForm addTask={this.addTask}/>
        <TasksList tasks={this.state.tasks} removeTask={this.removeTask}/>
      </div>
    );
  }
}

export default App;
To the state of this component we will add ‘tasks’ array that will store all the existing tasks. Init this array in the constructor to an empty array [].
addTask() function takes one parameter, the task that we want to add to the ‘tasks’ array. This function should be passed to the <SubmitForm /> component, because this is the responsible component for adding new tasks to the list.
removeTask() function takes the id of the task as a parameter and filters the ‘tasks’ array in order to remove the specific task with this specific id. This function should be passed to the <TasksList /> component in addition to the ‘tasks’ array, in order to be able to pass it to every <Task /> component, so it can call the removeTask() function when the delete button of the task is pressed as we mentioned before.
Conclusion
Remember that there is no one has ever learnt something new by just reading the syntax or the examples on the internet. The learning will take place and be productive only when you apply the concepts you learn the way you need them to be for your application.
As you can see, by building this simple Todo App we covered almost every interesting detail in React! In addition to this excellent React app example, we’ve also covered so different CSS rules and improved our styling skills.
What’s Next?
In this tutorial, we successfully built a Todo App that allows you to add new tasks, mark a task as done and remove old ones. Starting from this point, we can be so creative and think about several ideas to improve this app and practice our JavaScript skills even more.
For example, we can add a priority for each task that indicates how important the task is. We can differentiate between the importance of the tasks by using different background colors! We can also give the user the ability to move and drag tasks in the list so he can determine the order that he wants the tasks to be done. You can imagine how close we are to Kanban Board style.
Since there is no limit for creativity, I would like to hear from you what do you think will be great feature for this simple initial Todo App.
You might face some difficulties along the way of building this project, don’t hesitate to ask! I would love to help you out and answer any question that might arise.
Thanks for reading, and happy coding!